Let’s say you want to collaborate with other gamers and fans on Discord by becoming a VTuber (Virtual YouTuber). Then you might want to think about utilising Discord Reactive Images. The easiest and least expensive way to begin VTubing is via streaming with a reactive PNG VTuber avatar.
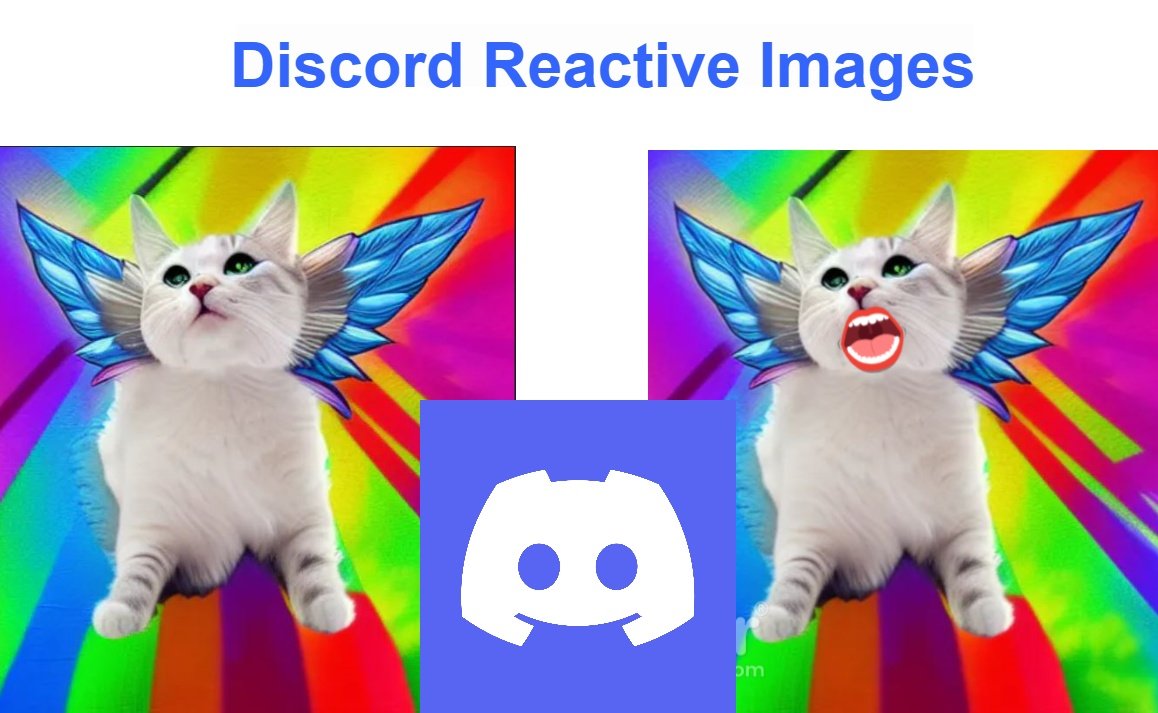

VTubers are making a comeback everywhere, working together on platforms like YouTube, Twitch, and Discord as 2D and 3D animation gets better. It is possible to construct and modify VTuber or PNGtuber models to reflect what their characters say and do in various contexts. If you need a face cam alternative for streaming or using in Discord calls, check Discord Reactive Images.
You will discover how to set up and use Discord Reactive Images in many methods for novices in this guide.
What Exactly Discord Reactive Images Do?
While broadcasting or taking part in Discord calls, Reactive Images let your online avatars respond to your voice or actions by moving. Additionally, it aids in your anonymity. VTubing is a fantastic technique to keep things interesting and captivating for your audience at those moments when you are not in the mood to be in front of the camera.
You can use it to make videos with a digital PNG character or avatar that is animated in real time using speech recognition software and commonly resembles Japanese animation. Your PNG, 2D, or 3D model can speak for you when you are live-broadcasting on Discord or running a private fan server.
Working With Discord Reactive Images and the Necessary Prerequisites
Discord enables streamers to use their fan servers for in-game and out-of-game communication with subscribers for community bonding. On their Discord servers, which are integrated with their Twitch channels, your favourite streamers will be available for chat if you are a Twitch watcher. Using Discord’s text channels, voice channels, private group direct messaging, game bots, live broadcasting to an exclusive audience, and other features, streamers may keep their servers occupied.
You have a variety of alternatives depending on how much technical skill and personalization you want to put into your Discord reactive image. Starting out as a PNGtuber, you can advance to 2D or 3D rigging as your Vtubing skills improve. The best aspect is that you do not need to spend a lot of money on expensive cameras, lighting, or face tracking software.
PNGtubers only need a little setup to start. You need a few items to get your reactive image ready, such as:
- A minimum of one and a maximum of two PNG images to use as your Discord reaction picture
- a microphone with a noise-cancelling function so you may record your speech without background noise.
- To add a browser source for live streaming and video recording, use OBS, or Open Broadcast Software.
Where to Find Personalized Reactive Images
PNG graphics can be obtained in a variety of methods for your Discord avatar. Using either free or expensive drawing programs, such as FireAlpaca, Procreate, Inkscape, or any other well-known drawing program, you can make your own PNG model. Prior to sending the image to the Discord server, make sure to export it as a transparent PNG cutout. After creating your PNG, you may use a free online application like removebg to remove the background to get a transparent PNG image.
If you’re willing to spend some money, you may also purchase or commission a bespoke PNG through Etsy, Instagram, or Fiverr, where you’ll discover a wide range of digital artists that can make a PNG according to your demands. Verify that you will hold the full copyright to the photograph so that it cannot be copied or used by anyone else and make sure to ask for examples of their previous work.
Methods for Adding Discord Reactive Images
There are other ways to include a reactive PNG in your discord conversations and collaborations, but for the benefit of newcomers, we’ll concentrate on two straightforward approaches that won’t take up a lot of your time.


We’ll talk about the following methods in this post:
- Using Reactive by Fugi, a piece of software that works with Discord to create a PNG avatar that reacts to voice commands.
- You can manually create Discord Reactive Images by manually adding custom CSS, which you can then alter, personalise, or resize as you like.
You should download the Discord program onto your desktop computer since some procedures might not work with mobile devices.
Below, we’ll go over each of the aforementioned processes in further detail.
Method 1: Adding a Reactive Image With Fugi’s Discord Reactive Images
Discord PNGtubers utilise Fugi’s Discord Reactive Images the most since it is the simplest and most widely used tool. You will need a Discord app linked to a voice channel, OBS, and a microphone for this.
The following are the comprehensive step-by-step instructions:
- Install the desktop Discord application and an OBS (this tutorial uses free and open source OBS Studio)
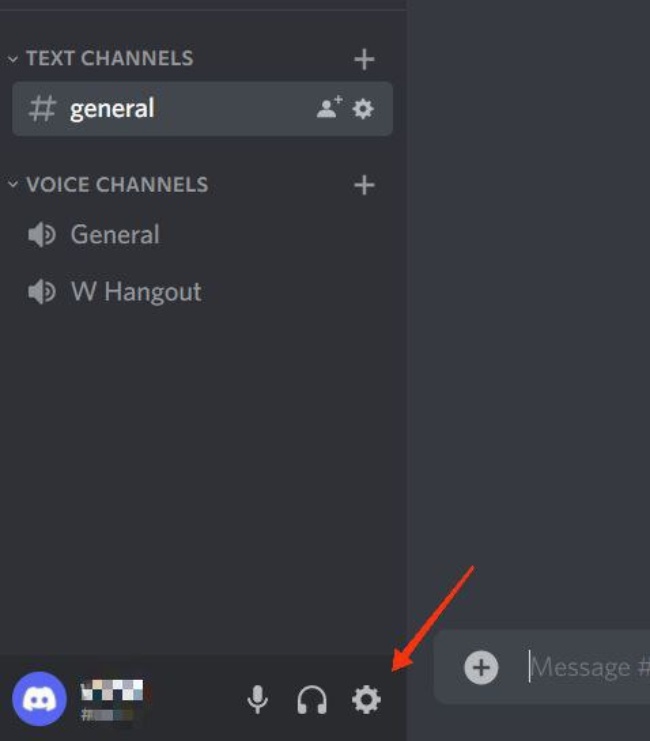
- Open the Discord app now, then in the bottom left corner, click the Settings icon next to your username.

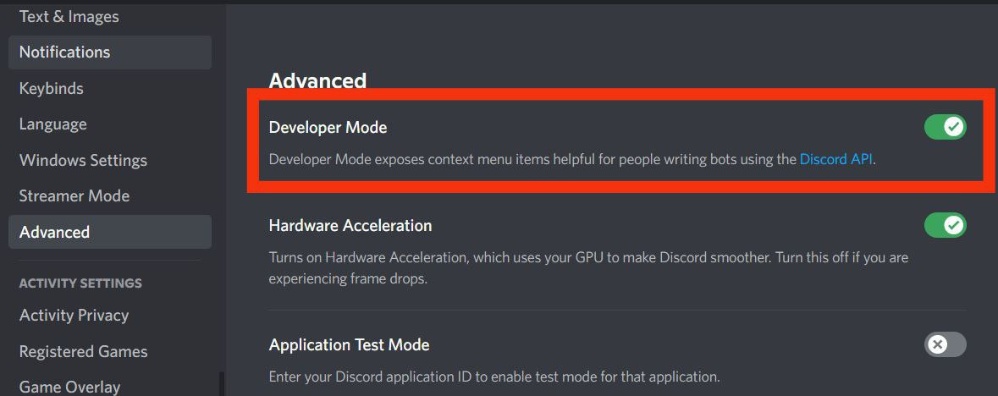
- Scroll down to Advanced in the Settings window’s left side, then turn on Developer Mode there.

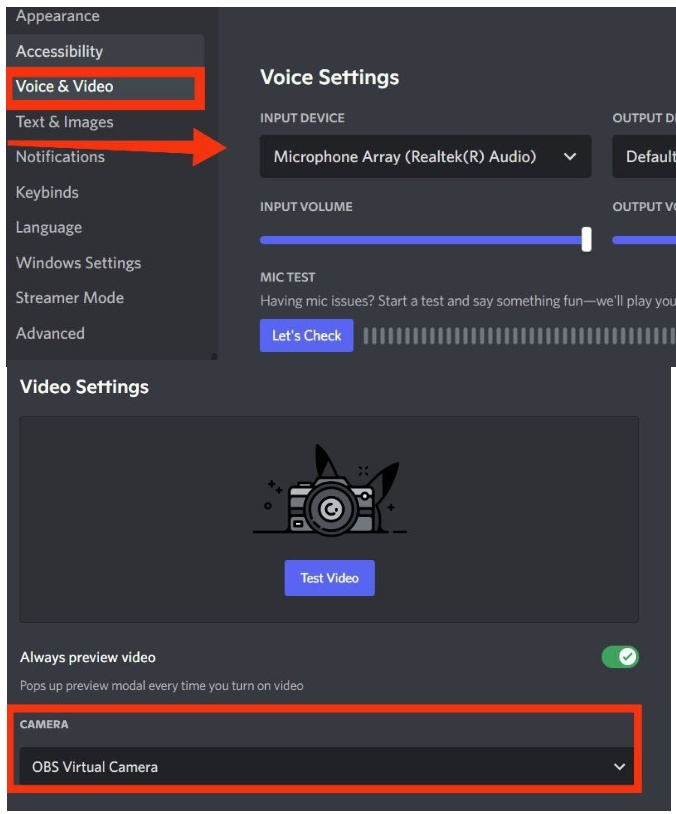
- Select Voice & Video from the left side at this point. Under Voice options, select your microphone and test it to make sure it functions. Select OBS Virtual Camera from the dropdown menu that appears under the Camera section of the Video Settings menu (if you have installed OBS Studio).

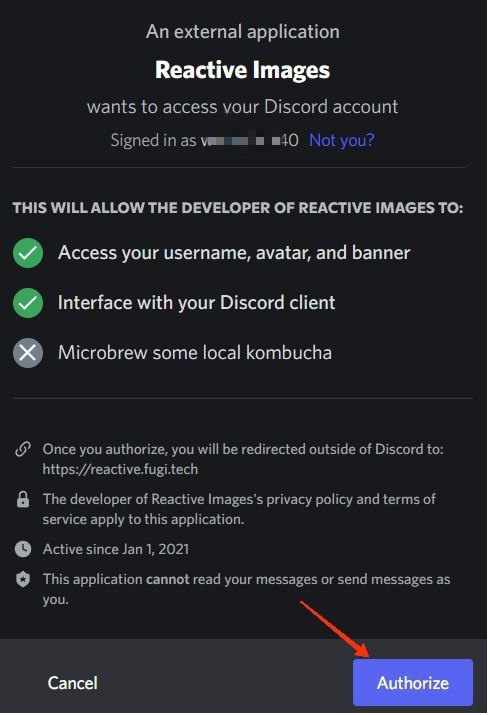
- Now click Login on the Fugi’s Reactive website. You must then authorise the app by signing in to Discord once more and granting the required app permissions.

By doing so, you’ll be directed to the main page for configuring items. Click the camera icon under “Set Inactive Image” and choose the first PNG with its mouth closed if you have both of your PNGs prepared (one with a closed mouth and the other with an open mouth for your talking avatar). Repeat the procedure under “Set Speaking Image” after which you should choose the second PNG with an open mouth. After you’re done, click Save.
photos that are fugi-reactive; upload PNGs
- Several settings, including image alignment, spacing, and the Bounce effect between transitions, are adjustable on the left. After finishing, click Apply. To copy the URL, click the Copy icon next to the Individual Browser Source under Links.
- reactive images for fugi on Discord – browser source
- Open OBS now, and under Sources select the plus sign (+). Click Browser, enter a name for your source under Create new, and then click OK.
- reactive graphics for discord – add browser source to OBS
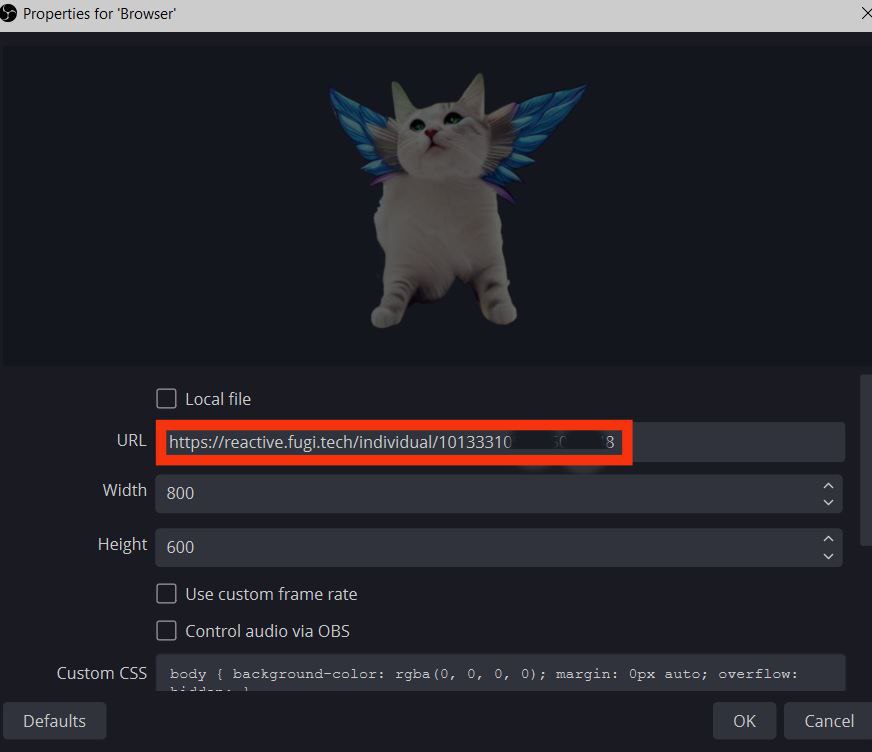
- Paste the link you just copied next to the URL in the Properties window, then click OK.
- The Reactive Image is now visible on top. You can adjust the image’s width or height by dragging it.
- reactive image of discord
- Click Start Virtual Camera under Controls in OBS to launch the Discord feed.


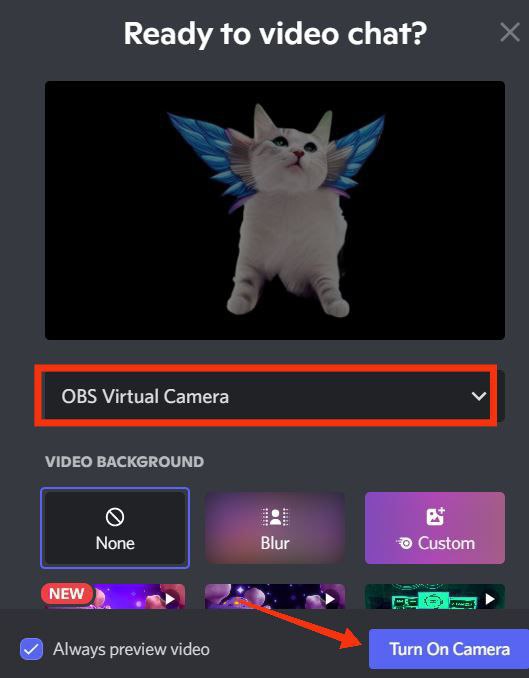

Lastly, go back to the Discord application and join a voice channel (create a private voice channel to test it out first). Click Turn On Camera under Video in the bottom left.
reactive vtuber obs png
Your reactive picture should now be visible on Discord, and you can test it out by using the microphone. Now that the reactive image is available, Discord calls can be used for streaming and collaboration.
Method 2: Using OBS StreamKit Overlay to Add a Reactive Image
You can utilise Discord’s StreamKit Overlay as an option if you want to avoid manually uploading two images and instead provide custom CSS code.
The following are the comprehensive step-by-step instructions:
- Go to the Discord StreamKit website and choose Install for OBS or Install for XSplit based on your streaming application.
- It will show the Widgets page if you are already logged into Discord; otherwise, it will ask you to do so.
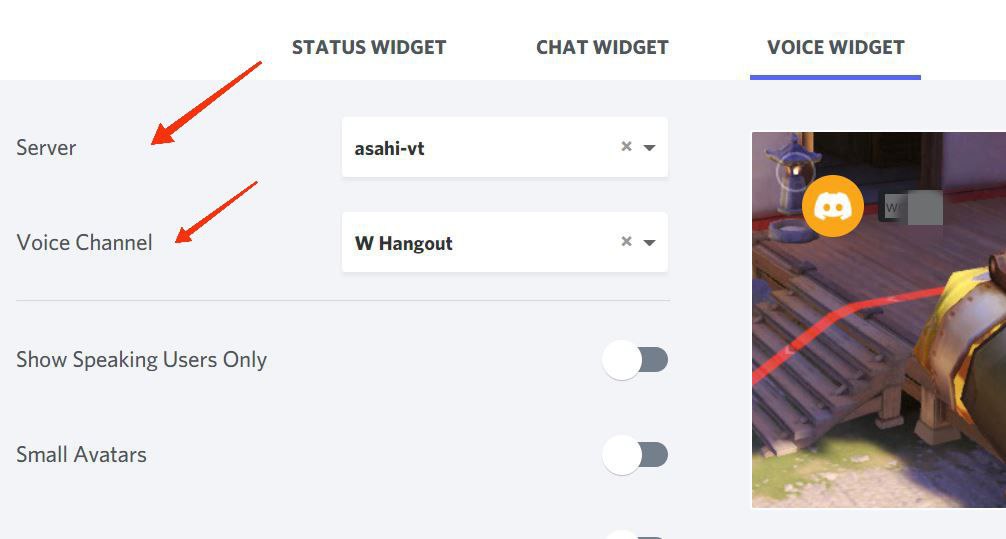
- Select your server name and voice channel from the dropdown menus next to Server and Voice Channel, respectively, in the Voice Widget. Enable the Hide Names option in Discord calls if you wish to conceal your username.
- overlay for pngtuber streamkit
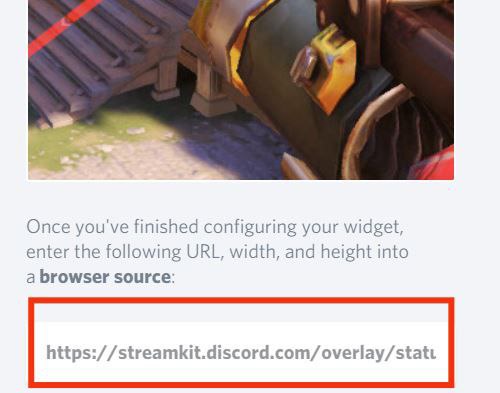
- Under Voice Widget in the bottom right corner of the page, copy the browser code.
- overlay for discord vtuber using streamkit
- Open OBS, then from the Sources menu, choose the + (Add Source) option. After pasting the URL you just copied next to the URL, click Browser > Ok, followed by OK.
- Create a secret text channel in the Discord app so you may store your PNG images and upload both files later.
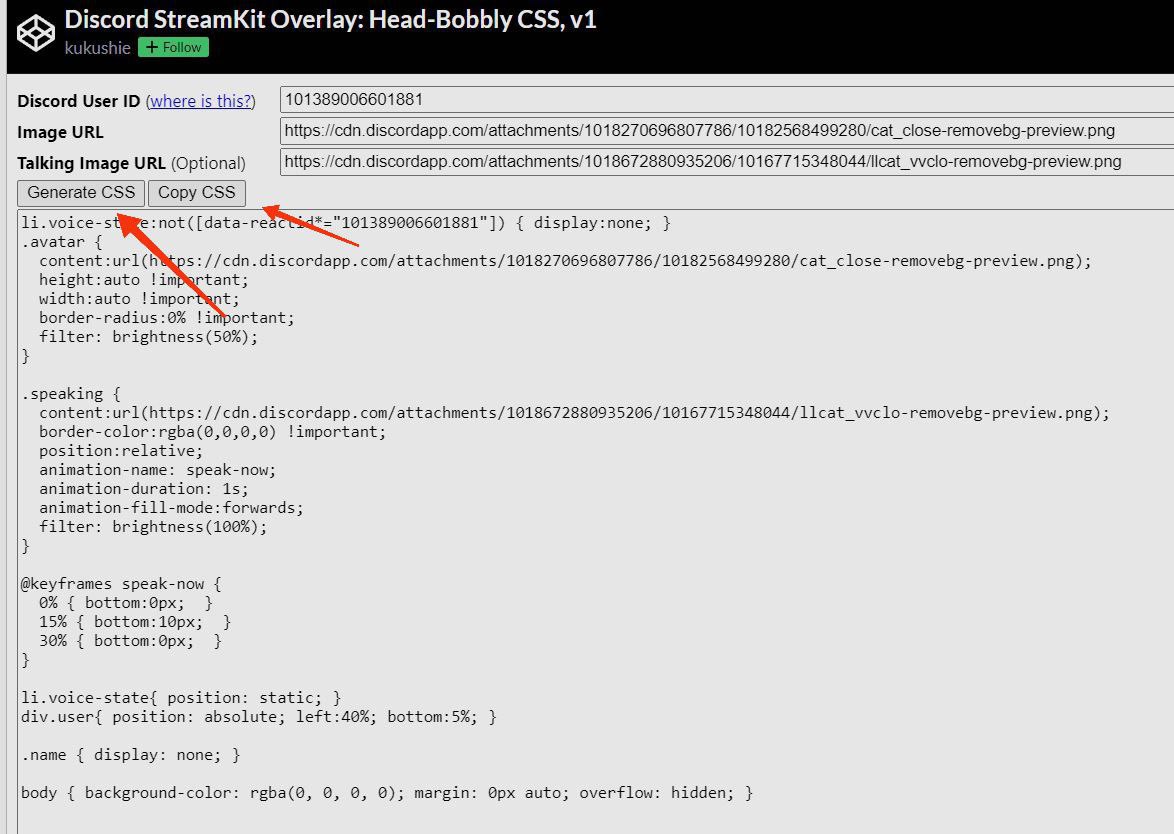
- Launch a browser and click the CSS generator link.
- Return to Discord and choose Copy ID by right-clicking your username in the bottom left corner. In the CSS generator, type the ID next to the Discord User ID.
- reactive PNG for discord with custom CSS
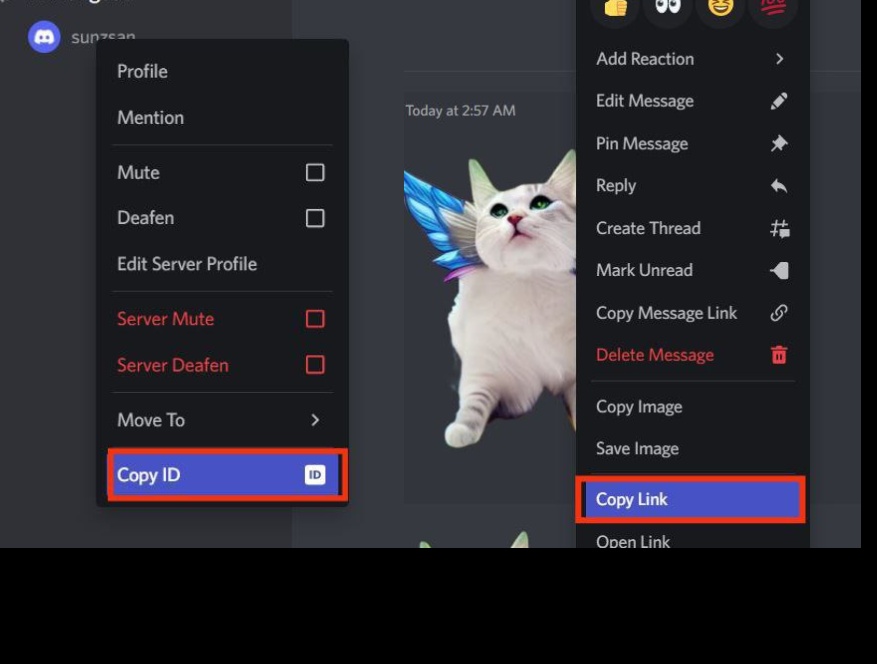
- Then, paste the IDs next to the “Image URL” sections in the CodePen window by opening the Discord channel where your PNGs are kept, right-clicking on each image, selecting Copy ID, and then pasting.
- Verify the image links before clicking Generate CSS to create code that can be edited. To copy CSS, click the button.
- Reactive png vtuber for Discord – copy custom CSS
- Now go back to OBS and choose Properties from the context menu when you right-click on the browser source you made using StreamKit.
- Paste the code you just copied into Custom CSS, then click OK.


Your ready-to-use reactive image should now be visible on top and can be dragged and resized. Go to Controls in OBS and choose Start Virtual Camera to connect to Discord.
By using OBS to share your entire screen or simply the gaming application window, you may start streaming. To capture the game screen, click + under Sources and choose Game Capture (Windows) or Display Capture (Mac). As an alternative, you can utilise Windows Capture to show the users of your Discord voice channel the browser window while you are playing a game on the browser.
How to Connect Your Twitch or YouTube Channel to Discord
Discord is frequently used by live streamers and the communities of Vloggers to develop their audiences and increase viewership. For those who are new to the streaming industry, combining Discord with other streaming platforms is a smart idea. You can offer your subscribers various servers and channels so they can all watch your streams simultaneously. It gives you the chance to develop a devoted following, offer unique advantages and features, and inform your community of any upcoming upgrades.
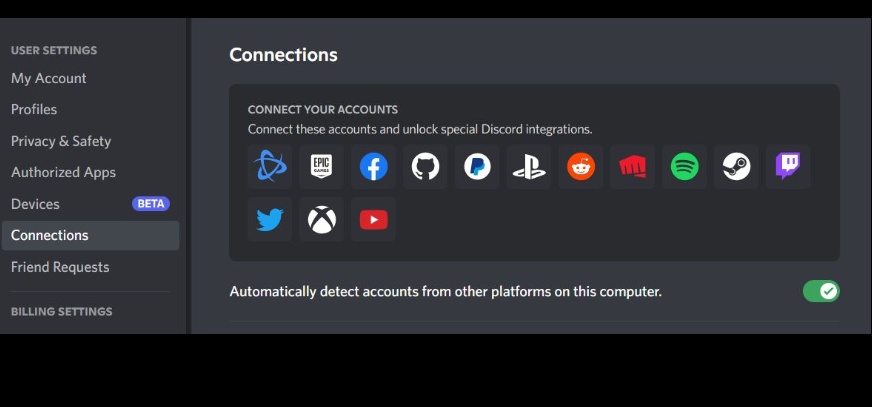

Launch Discord and click the Settings gear icon to the right of your username in the bottom left corner to link it to Twitch or YouTube. Go to Connections, choose the Twitch and YouTube icons, and then grant each service access to connect to Discord. To make it a delightful experience for everyone, you may customise server roles and permissions as well as add bots, personalised emojis, community events, and more for your subscribers.