
How to Allocate More RAM to a Minecraft Server
Over the past few years, Minecraft has gained popularity among gamers. Any platform, including Android, iOS, Mac, and Windows, can play this game. Minecraft uses RAM much as other games. The problem arises because Minecraft only uses 1 GB of RAM by default. For a better gaming experience, you may fortunately set aside extra RAM. How can I give my Minecraft server extra RAM?
To address this issue, you don’t need to be a computer whiz or gaming guru. The 2.0.0 upgrade simplifies everything, so thanks for that. As long as you follow the proper guidelines, increasing the RAM that Minecraft is using can be done without difficulty.
What Is Minecraft Server?
You have arrived to the appropriate location if you are a novice who has no concept what a Minecraft server actually is. The multiplayer feature in Minecraft is called the server. You can play and communicate with other gamers online or over a local area network. Short version: A Minecraft server was developed to provide players with a better gaming experience.
In order to maintain and host a server, you must supply a variety of tools. LAN, external server clients, rented servers, realms, and dedicated servers are among the prerequisites. Default multiplayer software is also needed. After that, administrators and operators oversee the server to make sure everything operates smoothly.
There are a number of prerequisites that must be met in order to host a Minecraft server. Depending on the server software being utilised, these requirements could change. The Minecraft server normally consumes at least 3GB of your RAM when it comes to memory needs. The better, the more memory it has. For this reason, giving a Minecraft server extra RAM will enhance the gaming experience.
How to Upgrade a Minecraft Server’s RAM without a Launcher
In order to improve Minecraft’s performance, you can add extra RAM to the server if you believe it utilises too little RAM. However, confirm that your computer has enough free memory for this. The procedure is rather straightforward, albeit it could require some work and focus. You can fix the tiny RAM issue by following the steps listed below.
- Obtain access to your computer’s Minecraft server directory. It is a directory that houses the Minecraft server.exe file. If you are unsure about its location, you can search the Minecraft server.
- Select New Item after clicking Home. After that, select Text Document to create a text document in the directory.
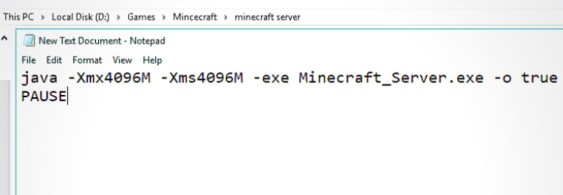
- Then enter the following into a fresh text document: Java: Minecraft Server.exe -Xms####M-Xmx####M-o true PAUSE

- Then, substitute the #### with the number of megabytes (MB) of RAM that you want to allot. For instance, if you wish to provide the Minecraft server 3 GB, enter 3072. Keep in mind that 1024 MB is equal to 1 GB.
- The document can be saved by selecting File and then Save As. Choose All Files as the type now. Make careful to change the extension from.txt to.bat.
- The new launcher is the document you created. Double-click the file to launch it.
How to Increase RAM on a Minecraft Server Using the Stock Launcher
You must have the correct Java version in order to give the Minecraft server extra RAM. You can’t increase the server’s RAM without having it installed on your machine. Thus, you are limited to using the preset amount of RAM. Install Java 8 64 bit, and the Minecraft server will have additional RAM available.
The actions that follow will enable you to use the launcher to allocate extra RAM after downloading the correct Java version.
Minecraft Server with Default Launcher and Additional RAM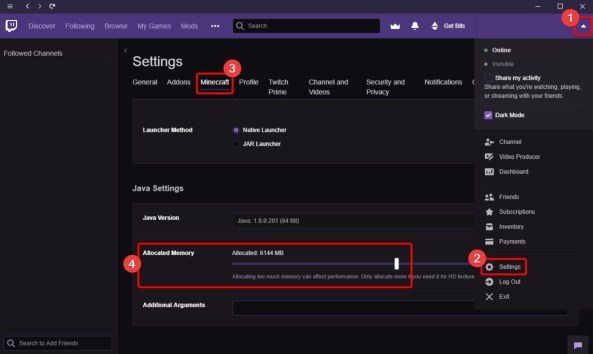
- Launch Minecraft. Click the Installations tab to access it.
- Click the symbol with the three dots after choosing your version. Choose edit.
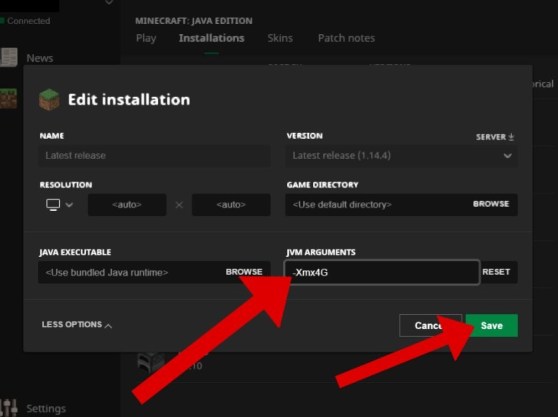
- The drop-down menu will open when you click More Options. JVM ARGUMENTS navigation Something along the lines of “-Xmx2G-XX:+UnlockExperimentalVMOptions” will appear.
- You must pay close attention to the -Xmx2G. The amount of RAM that has been assigned is shown in figure 2. It uses 2GB in this instance.
- Replace the number with the number you want to change the amount of RAM that is allotted. Don’t just devote all of your computer’s RAM to Minecraft; your computer requires some RAM space to run other processes, so be sure to replace it with the appropriate amount that your system can manage.
How to Increase Minecraft Server RAM with the Twitch Desktop App
Using the Twitch desktop app is another option to modify the RAM allotted on a Minecraft server. By doing this when using this software, you may easily make adjustments.
Launch the computer’s installed version of the Twitch Desktop software. Select the 3-line icon that is located in the top left corner. Select Settings after selecting File.
Select the Minecraft tab, then select Java Settings.
You will now notice the Allocated Memory bar.
Simply slide the bar to alter the amount of RAM allotted to Minecraft. Drag the bar carefully, making sure it fits the capabilities of your computer.
How to Increase RAM on a Minecraft Server Using Different Launchers
You can switch the RAM allocation for a Minecraft server using various other launchers. You can choose Voidswrath and ATLauncher from the list of launchers because they are convenient. With these launchers, changing the amount of allocated RAM merely requires three steps.
1. VoidLauncher
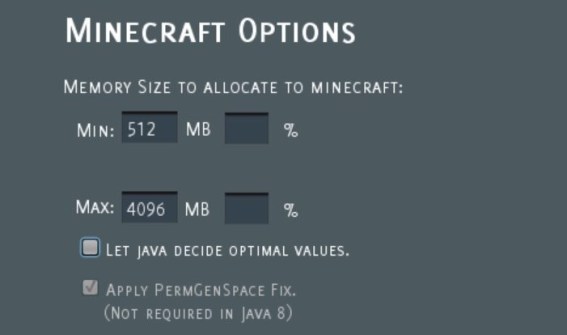
- Launcher opened. Navigate to the Options link in the top right corner of the page.
- Click the memory dropdown after locating Minecraft Options. The assigned RAM can be changed to the required quantity.
- You can launch the game with a better experience after altering the amount of RAM assigned.
2. ATLauncher
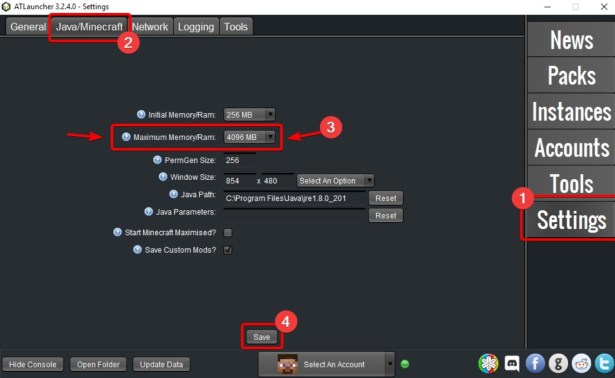
- Click Settings in ATLauncher’s bottom right corner after launching it.
- Go to the Minecraft or Java tab. The next step is to find Maximum Memory/RAM.
- You can now adjust the assigned RAM size and get started.
- If you know what to do, increasing the RAM allocation on a Minecraft server is not a difficult operation. Changing RAM allocation is rather simple, even for beginners. You may increase the amount of RAM for the finest gaming experience in a number of methods. Make sure you only add RAM that your computer can handle.